DISTRESSED FURNITURE FINISHING MADE EASY!
Have you seen an interesting piece of furniture or maybe a big frame or mirror you would like for your home but it’s not in great shape or looks outdated? If you also like the distressed look that’s so popular now, then read on to learn how to transform those items into proud members of your household. The distressed look converts imperfections—chips, dents, and dings —into charm and character. Poof! Like magic. Well, like magic with some good old fashioned elbow grease.
I found this framed mirror/coat rack in a local thrift shop for $5.99. I thought it would be perfect in my entryway for keeping keys, sweaters, and dog leashes handy for those late-night walks. As you can see from this photo, the piece is nothing special and the mirrors were scratched around the edges, but for the price, I thought it was well worth applying the “distress” test.

$5.99 at a local thrift shop!
What you will need:
Sandpaper
Screwdriver
Flat paint
Wood stain
Paint brushes
Furniture wax
Step 1
Remove any hardware, glass, mirror, or backing from your piece.
Step 2
Sand down your piece. If you have a very large piece, you may want to use a small, electric palm sander for this step. I like to do most pieces with just my own power and sandpaper. (It’s a great way to work out frustrations and you’re getting a little exercise to boot!) The goal with this step is to rough up the surface. You aren’t trying to completely strip the piece. You just want a new finish to have something to grab onto.
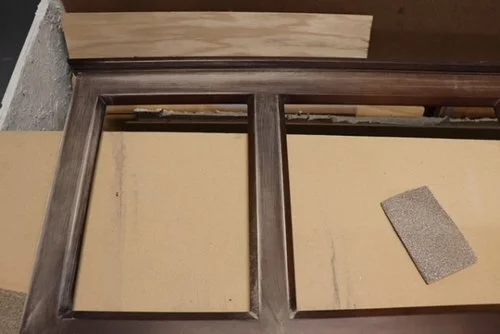
Sand your piece to rough it up enough to accept a new finish.
Step 3
Because I knew my mirrors were in such bad shape, I decided to paint right over them. I use hammered spray paint for the two outer mirrors, and for the middle mirror I used chalkboard spray paint.

First I painted all three with the hammered spray paint and later went back to center piece with black spray chalkboard paint.
Step 4
For the base color of the frame, I used regular flat white paint and a walnut stain. You can do this step two ways. 1. Take a light brush and apply flat paint to the frame, immediately follow by lightly brushing stain right over it. OR 2. Dip your brush into the paint, then lightly into the stain, then brush it on the piece. (Make sure you are using a brush you don’t care about. Also, don’t ruin your full cans of stain and paint by mixing them together. Instead, pour some paint and some stain in a separate containers.) Continue this process until your piece is covered. Repeat the layers of paint and stain as you work to get the look you want. It’s all about trial and error here. Once the base was the look I wanted, I went back in and dry-brushed a couple areas very lightly with a little darker gray flat paint and a very light green flat paint to give the look a little more dimension.

Several photos along the way to getting the finished look that I wanted.
Step 5
Once you have the finish how you want it and it’s had the chance to dry, grab a piece of fairly coarse sandpaper and sand part of the finish away. Start with your edges and corners and go from there. This is all about personal preference and the level of distress you prefer. (Remember, if you sand away more than you want to, you can always go back over a spot with your paint and or stain again.)

The final sanding is what to me really hits home the distressed look.
Step 6
Once everything is dry and sanded, give your piece a light coat of furniture wax following the directions on the can.
Step 7
Put your mirrors, glass, and hardware back on your piece and you’re all done! Move your new piece into its new home and enjoy!
NOTE: Because the mirrors on this piece were in such poor shape, I repurposed the two outside mirrors as backdrops for fun family photos and the middle mirror as a small chalkboard.

One final before and after. We love how the piece came out and the price was sure right!
The piece now hangs in our entryway and not only serves a practical purpose but is a fun way to display photos and messages.
This finishing process is tried and true for me. I have done it on many different pieces, large and small. I hope you will give it a try. It’s an inexpensive, easy way to create a beautiful distressed finish!
Now, what will you do next to love where you live?