What’s Fudge Got To Do With It?!
It’s getting to be that time of year where we are all trying to decide what and how much holiday baking we want to do.
I have published this blog for the past several years around this time and it was a big hit. I think everyone is always looking for those go-to recipes when holiday baking is looming large! I hope you enjoy these as much as I have over the years. Who knows, maybe one will become your family fave!
What’s food in general—and fudge in particular—got do with home décor? Nothing really, but I figured I couldn’t go wrong including “fudge” in my headline. Got you to read, didn’t it? I guess I could tell you that a beautifully decorated cake makes a stunning holiday table centerpiece or that decorated Christmas cookies can double as fun place cards or tree ornaments (if you don’t have overzealous dogs or toddlers in your house!). All these things are true - but what food contributes to most is atmosphere. I grew up in not just a Greek/Italian family, but a very Greek/Italian family, and food, and lots of it, was center stage throughout my childhood.
Baking makes your home feel warm and smell soooo good and baking at Christmas is the best! Holiday baking has created countless fun times and lasting memories in our house. I hope it’s a tradition my two daughters will pass on to their families one day. So, in that spirit, I wanted to step outside of decorating box long enough to gift you four of my favorite, affordable, time-saving holiday dessert recipes that never fail to please. You can whip up a batch of these treats quicker than you can say “the abominable snowman,” so, let’s dash away, dash away, dash away to the kitchen, shall we?

Easy, No-Fail Fudge
Ingredients
1 large package chocolate chips
1 can sweetened condensed milk
2 Tbsp. of peanut butter
Directions
Using cooking spray, butter, or margarine, grease an 8-inch square cake pan and set aside.
Put peanut butter, chocolate chips, and sweetened condensed milk in a microwave-safe bowl and microwave on high, stopping to stir every 15 seconds or so until the chips have melted. Make sure everything is mixed together completely and, working quickly, pour the mixture into your greased cake pan. Sprinkle on some chopped peppermint candies to add color and extra flavor if you like. Place in fridge to allow fudge to set. Remove from pan and cut into small squares.
TIP: You can use half peanut butter chips and half chocolate chips, or any combination of flavored chips you like. There are many kinds to choose from now!
TIP 2: If you or someone you love is allergic to nuts, you can make this recipe without the peanut butter and it will turn out just fine!

It Doesn’t Get Any Easier Toffee:
Ingredients
1 C sugar
1 C butter
1 tsp. quality vanilla extract
3 Tbsp. water
Directions
Add all ingredients into your saucepan. Heat over medium high heat, stirring constantly (I do mean constantly, or it will burn!) until ingredients thicken and turn a wonderful caramel color. Be patient. This may seem like it will never happen and then suddenly, bam! It’s toffee! Working quickly, pour mixture onto an ungreased pizza pan. Mixture is extremely hot, so be careful and plan for a good safe spot for the pan until it’s cooled completely. Once cooled, loosen the toffee from pan and break into bite-size pieces.
TIP: When the toffee is about halfway cooled, cover the top with chopped chocolate or chocolate chips and create a delicious melty spread over the toffee. Add chopped pecans or walnuts if you like and gently press into the chocolate.

Kourambiedes / Greek Christmas Moons
Ingredients
1 pound of butter
1/2 C. powdered sugar
4 to 5 C Flour (as needed)
Juice of one orange
1/2 tsp. baking soda
Directions
Cream butter until smooth. Add sugar and beat until mixture is creamy. Add orange juice and mix until frothy. Add baking soda. Now mix in flour a couple of cups at a time. Dough should be the consistency of heavy Play-Doh. Using about 1 big teaspoon of dough, make into crescent or round shape and place on ungreased cookie sheet. Bake in 300-degree oven for about 20 minutes. Remove from oven and let cool enough to handle, then roll in powdered sugar until covered.
TIP: Cover in powdered sugar while the cookies are still warm so it will stick to them.
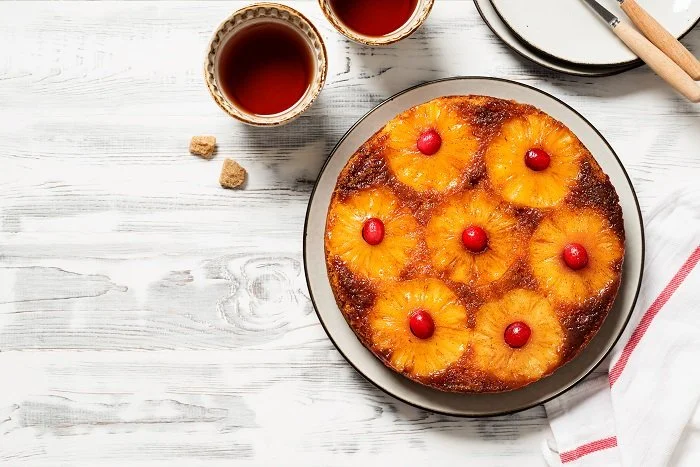
Pineapple Upside Cake
Ingredients
1 20 oz. can of pineapple slices (drained but set juice aside)
1/4 C. butter
1 C. firmly packed brown sugar
1 6-oz. jar of maraschino cherries without stems
1 box of your favorite yellow cake mix
Directions:
Topping:
In a 10-inch cast iron skillet, melt the brown sugar and butter to make a syrup. Place pineapple rings and cherries into the syrup in a pattern of your choosing. Turn heat off. If you don’t have a cast iron skillet, substitute a 13 x 9 cake pan. Melt your brown sugar and butter in a saucepan, then pour into a cake pan and add the pineapple and cherries.
Cake:
Prepare yellow cake mix using the pineapple juice in combination with water for the liquid needed. Pour batter into skillet gently to completely cover your topping. Bake at 350 until the cake is golden and toothpick inserted into center of cake comes out cleanly. Remove from oven and gently run knife around the edge of the cake and then place your serving plate over the skillet or your cake pan. Yep, you guessed it, time to flip it upside down. Be very careful here as the skillet or cake pan is extremely hot and you don’t want to get burned. Flip with care using oven mitts.
TIP: If you want to get really festive, you can find maraschino cherries in green so you can use red and green cherries and give your cake a holiday flair!
I hope you get as much enjoyment out of these recipe favorites as my family has. I gotta run—I think a big piece of fudge is calling to me!
Now, what will you do next to love where you live?
Please feel free to reach out to us at The Redesign Habit and ask questions or simply share a project that you are working on or have completed.
For more great stories and ideas please follow us on Facebook, Instagram, and Twitter.