Patio Remodel or Tear Down That Pergola!
A project that made our 2021 home list was revamping our patio. People tend to prioritize indoor spaces when it comes to makeovers, but if you spend much time outdoors make sure you’re treating your exterior space with the same love.
Our story begins with a pergola that was clearly having issues as it was started to lean forward, bad for several reasons, especially because it was leaning toward our pool. Although disheartening because the pergola was less than five years old; it was installed right before we moved in, and it was undeniably a safety hazard that needed to be addressed.

Spending money is never popular with my hubby, but he was pretty excited by the prospect of tearing down a big old’ structure. Guys and demo, right? (I know gals like demo too, including me, but this was a bit ambitious for my comfort). Hubby, who is pretty handy and very safety-minded, convinced me after watching many how-to videos that he could do the deed without endangering himself, the patio, or the pool. He sold his case, repeatedly, and eventually convinced me.

**SAFETY NOTE: While we decided to demo the pergola ourselves, I am not recommending anyone does the same thing without the proper knowledge, skills, or tools to do a project like this safely. If you are unsure about any of those things, hire a professional.
The process took several days. He proceeded carefully and took his time. As he began to remove pieces, it was clear almost all the wood had rot underway so taking it down was the right decision.

Obviously one of the biggest challenges with any demo is what to do with whatever you’re getting rid of. Fortunately, we have a spot on the side of the house to move the debris until the job was completed and the right tools to cut it up to be pieced in the trash for multiple weeks. Hubby celebrated the week that the final bit of the rotted patio met its fate in a garbage truck headed to the landfill. If you have kidlets around, you may need a rental dumpster to keep sharp and dangerous items off limits as the job progresses. If a dumpster is overkill for your project, the big home stores also sell giant contractor trash bags that you buy, fill, and pay a fee to have hauled away.
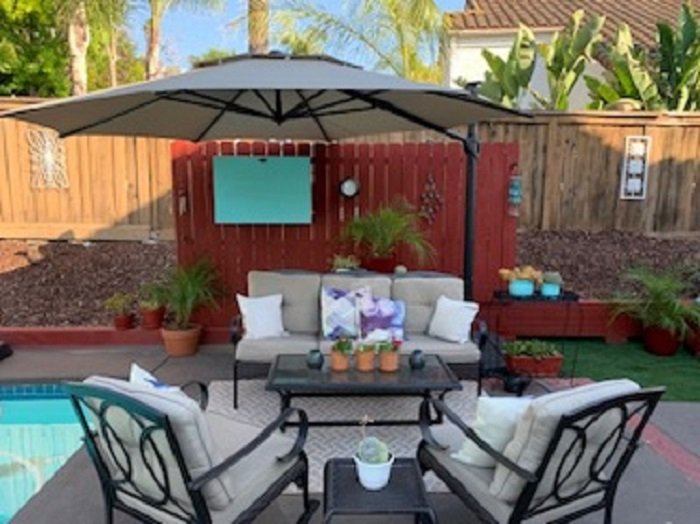
Once the demo was done and cleanup complete (clean-up is always so much work!), it was time to evaluate the cleared space and reimagine how to use it. We live in San Diego, so our patio gets quite warm much of the year. Shade was a top priority, and actually an opportunity to improve what the pergola had provided. Shade not only helps us humans enjoy the space but also helps prolong the life of patio furniture and fabrics that take a beating in close to 300 days of sunshine. Besides the inconsistent shade a pergola provides, we didn’t really want to spend big bucks building a new pergola. That led us to consider pre-built options—everything from pergola kits, to gazebos, to soft-top, tented structures.

After much deliberation and research (always do your research), we decided a cantilevered extra-large umbrella would fit our needs. We can move it sideways and up and down to block the sun at almost all times of the day. It also has solar lights at night bright enough to read or play games. Our umbrella has all the bells and whistles and was still much more affordable than most of the other options. Plus, nobody to hire or wait for. Assembly was required but it wasn’t bad at all. And we were able to find one that tied in nicely with the color of our patio furniture. Boom, decision made, and we couldn’t be happier with the results!

The final part of the great patio makeover of 2021 was building a wall and adding it to the one end of the patio behind the furniture grouping. This wall helped serve several purposes:
1. It makes that end of the patio feel more like a room.
2. It gave us a place to secure a cabinet to house an outdoor tv.
3. It gave us a place to add some hanging décor since we took down the pergola and lost the hanging space we had on the posts.
4. It gave us a great way to add a little color to that space.
To recap the patio advice: know your abilities and limitation, plan for clean-up and removal, clear the space so you start with a blank slate to imagine solutions, do your research, and consider costs and time. Finally, think through all the ways you will use the space so you end up with a solution you will enjoy many years to come. Sound familiar? These are the same tips that apply to any interior projects.
Now, what will you do next to love where you live?
For more great stories and ideas please follow us on Facebook, Instagram, and Twitter.