My $4.99 Table Project…
Goodwill store. Table. $4.99. As in less than five bucks. Four. Ninety. Nine! Yes, I’m more than a little excited about my latest thrift store find turned into adorable little accent table. Did I mention the table was only $4.99? That merits consideration for the bargain Hall of Fame! So, bargains do exist, and with a little elbow grease a bargain can become a treasure. Reading this blog won’t guarantee you’ll find a $4.99 bargain in your market, but it can help you turn whatever bargain you find into a keeper that will earn a rightful place in your home.
1. Shopping
This is one of my favorite steps because you never know what you might come across –like a table for only $4.99. I’ve found everything from lamps to coffee tables to desks and dressers and everything in between. Many times, I’m not seeking anything in particular, I’m just browsing. That seems to be a good approach. I also recommend setting a budget before heading out to help you from falling victim to impulse buying. Remember that for all the great bargains out there, you’ll find plenty of over-priced items, too. Fortunately, when I found this table, I didn’t come anywhere close to a budget limit. Did I mention the table I found was only $4.99? Because it was solid wood and had a unique shape with interesting hardware, I couldn’t pass it up.
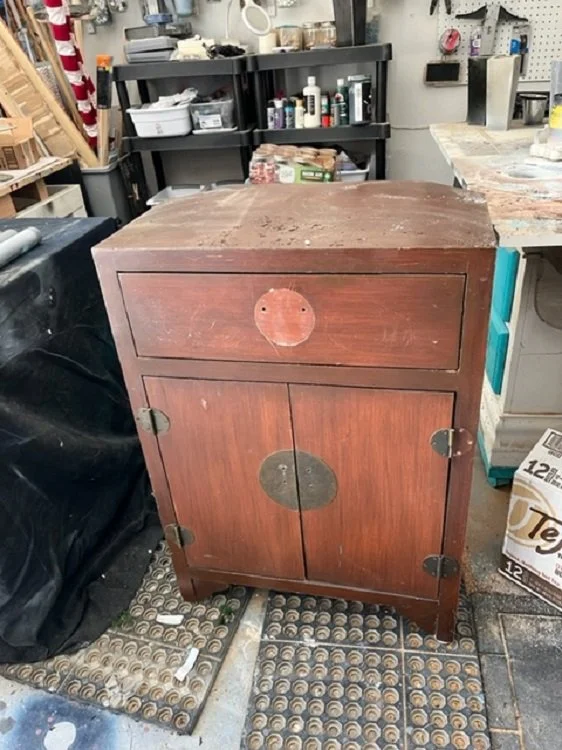
The table in her original state!
2. Decide how to redesign the piece
Maybe it will need to be stripped and refinished, maybe it will just need a cleanup and new hardware, maybe you’ll want to completely rework it and give it a new purpose. Sometimes it takes me a week or two of mulling and imagining before I decide how I want to approach a new piece. Let the piece speak to you. Oh yes, pieces speak if you listen.
3. Prepare the piece
For this piece, I knew I wanted to use chalk paint to change the color, and I knew I wanted to tile the top. This particular table was also missing handles on the bottom doors, so I had to figure out what I wanted to use to replace them. I removed the doors, drawer and all the hardware for easier cleanup and painting. Next, I wiped everything down to clean off loose dirt, dust, cobwebs, etc. Finally, I lightly sanded everything to remove some small scratches and dried old paint.
4. Tile layout and tiling
Because I wanted to tile the top, I had to figure out the what and how. Luckily, I had some leftover tiles from our kitchen remodel. This part is fun. It’s solving a puzzle and creating art at the same time. Once I knew my layout, I tiled the top and left it to set up for a couple of days.

I played around with different tiles and layouts before coming up with the final plan…

After tiling the top, I went on to paint the body of the piece….
5. Paint
I used light gray chalk paint for the body of the piece, the drawer and door fronts. It took two coats, except for the doors and drawer, which took three.
Like what you’re reading? Subscribe to the blog.

I worked my way around the piece with coarse sandpaper and did the distressing…
6. Distress
Distressing this piece gave it a lot of character so that step came after all the paint was dry. Using medium coarse sandpaper, I sanded down edges of table, doors, and drawer until some of the wood underneath came through. If I had some spots, where I took too much off, I simply went back and added some paint back to those areas.

Time to reassemble and trim out the top to give it a nice, finished look…
7. Put it back together
Rehang the doors, put on all the hardware, line the inside of the drawer and because I tiled the top, I trimmed that out with molding to give it a finished edge.
Don’t forget to subscribe to The Redesign Habit YouTube channel to see these projects come together!
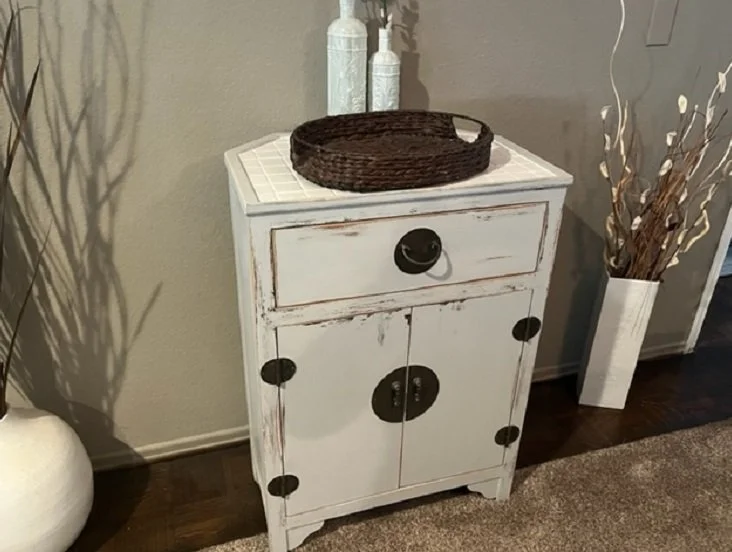
Project complete and now she lives in my dining room!
8. Figure out where the new piece will live
For me, sometimes I sell the pieces I refinish, and sometimes I keep them for our home. This piece was unique, and I had a good spot for it, so I decided to keep it. I think she looks right at home in our dining room.
The good news: I had everything on hand I needed to refinish this table. I always have leftover paint, and I always keep old hardware from past projects, so the only purchase, besides the table itself, was molding to trim out the top. All in, this cute little dining room addition cost a few hours of time and about $20. Not too shabby. Did I mention the table was only $4.99?!
Now, what will you do next to love where you live?
Please feel free to reach out to us at The Redesign Habit and ask questions or simply share a project that you are working on or have completed.
Don’t forget to subscribe to The Redesign Habit YouTube channel to see these projects come together!
For more great stories and ideas please follow us on Facebook, Instagram, and Twitter.