Super Easy Wall Art Project
Is that blank wall in your home mocking you? Don’t feel bad. I know what you’re going through. Every time you glance in its direction the blankness makes you feel inadequate. You would you love to wipe that orange peel smirk off its face by adding a beautiful art piece to that vertical void, but you have two problems. Lack of money and lack of time. This blog provides the solution to your wall woes. Read on to learn all about the super easy wall art project so you can—and this will feel soooo good--show your home who’s the boss.
Project Steps:
1. Figure out the size of your project: Assess where you will be hanging your finished project then plan out roughly how many picture frames, overlapping each other, you think may fill that space nicely.

2. Buy or find frames: I chose to go to a local dollar store to buy my frames. You could do similar, or perhaps you have unused frames in storage—or even frames holding pictures that you’re sick of seeing. The dollar store had a bunch of inexpensive options. All you need are the frames…no glass…no backing. Different types of frames will make for a more interesting piece, so don’t be afraid to mix and match. Make sure you get different sizes and more than you think you will need. Better to have a few to return rather than wish you had more options and wind up being disappointed with the end result.

3. Paint your frames: This step may or may not be necessary depending on the colors you want for your finished piece. Your frames could already be the colors you want. To be true to the principles of redesign, I encourage you to look at your “paint leftovers” and see if any colors speak to you that could add to the beauty of your art. One great thing about this project is that can be changed any time you start to get tired of it by introducing another color scheme.
4. Lay out your design: On a flat surface (a table is probably most convenient and easiest on your knees and back), play around with the frames until you find the look you want. Once you arrive at the look you want, take a picture in case your masterpiece gets “un-masterpieced” in the process. Next, glue the pieces together as needed and let them fully dry. Depending on the type and weight of the frames, you may be able to adhere them with putty instead of glue. PRO TIP: consider attaching frames as several sections rather than trying to connect all the frames as a single large piece that could be quite heavy.

5. Hang it: Once your piece (or pieces) has dried, hang it. If you have several sections, you can experiment on the final layout depending on you space them on the wall. You may need nails, or hooks or hanging strips depending on your unique artwork. PRO TIP: Bigger, heavier frames should either be hung alone or placed directly against the wall with other frames on top.
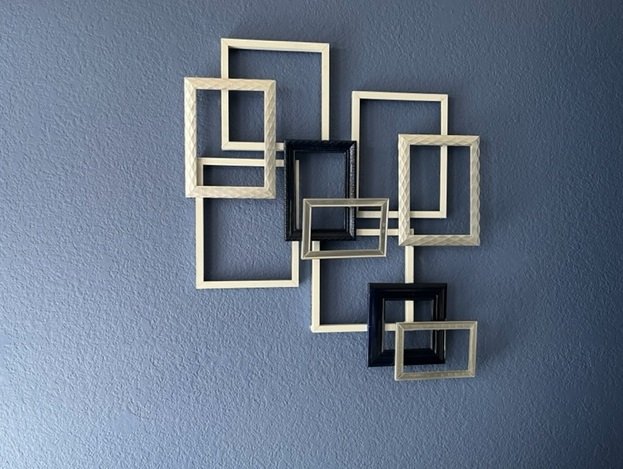

You’ll see that I created two slightly different arrangements to show different options using the same frames. If you look closely, you’ll see that some frames are hanging individually, and others are in layered sections.
I hope you try this project and stop the wall taunting in your life. It’s fun, easy, affordable and you get to be creative without the pressure of creating art from scratch.
Now, what will you do next to love where you live?
Please feel free to reach out to us at The Redesign Habit and ask questions or simply share a project that you are working on or have completed.
For more great stories and ideas please follow us on Facebook, Instagram, and Twitter.